Monday, February 22, 2010

Red Rock Canyon

The Red Rock Canyon National Conservation Area is a few miles west of Las Vegas, so it was an obvious side trip when we were in the city on the weekend of Chinese New Year and Valentine’s Day (see the Vegas post). It is easy to get to Red Rock Canyon on a long loop formed by Route 160 coming from the south end of the city and Route 159 coming from the central section of the city.

The maps above and below are courtesy of and copyright by Delorme. To learn more about Delorme and its mapping products, see http://www.delorme.com/.

The entrance to the Conservation Area is located near the “t” in Charleston Bl. on the above map. Pay the entrance fee at the booth. The daily fee is $5.00 as of this writing. The full one-way loop is 13 miles long. There are plentiful parking areas, some with rudimentary bathrooms.

Only vaguely remembering the last visit to the canyon, I woke around 4:30 am, then drove to Route 160 via I-15 from the hotel on the Strip. After stopping for gasoline, I arrived at the gate to the conservation area around 6:10. I drove the loop twice in three hours, stopping at places I missed on the first pass. The daylong pass allows for multiple trips around the loop, if you are so inclined.

As usual for early morning, the light quality shifted rapidly, but was generally good.

Early sunlight illuminates Mount Wilson's striped face.

 
Rainbow Mountain, shown above, resembles a giant molar tooth.

Sloping alluvial fans at the base of the mountains break the visual horizon. I framed the photos as close to true level as I could.

A view toward the south end of the canyon.

To the right of the frame of the photo above was a couple huddled under a coat over a large format camera on a tripod. Large format photography is generally considered to produce the best quality for landscape photography. I also shot around the couple for the photo below. In both cases, the subject was close, but framed the way I wanted it without including the other photographers.

The two above photos and the two following were all made in the Calico Hills, near the entrance. Using the hiking trails, it is relatively easy to get up close to the rock formations from the road, and multiple parking areas are close to the colored rock.


Red Rock Canyon is known world-wide for its rock climbing routes. Over 2,000 known rock climbing routes are contained within the conservation area.

The BLM (Bureau of Land Management) produced a “Keystone Visitor Guide” for Red Rock Canyon, and a copy is given to visitors when the fee is paid at the gate. The guide is full color on white book paper (appears to be recycled stock), and eight 11”X17” pages long. It is an excellent guide to the area, and includes a good descriptive list of 19 hiking trails, backed by a large hiking map.

For more information on the Red Rock Canyon Conservation Area, see http://www.nv.gov/redrockcanyon.

Friday, February 19, 2010

Vegas

In daylight, Las Vegas is much like other southwestern desert cities with casinos. Except that it’s Vegas, of course, and therefore a mythical place in the human psyche, and on the map.
It was a map we lacked when we drove up from California on the weekend of both Chinese New Year and Valentine’s Day. Dead reckoning would have worked out well, but the Strip was snarled. Sometimes I got the car up to 4 or 5 miles an hour for a couple seconds. It took us 55 minutes to drive from I-15 to Harrah's parking structure. But it was still better than flying into the airport.

The photo below is a view of Harrah's from the 3rd floor of the parking structure.


The photo below is a view from our 20th floor room. The window opened slightly toward the interior (see the windows in the photo above). I turned on the Vibration Reduction and Auto Focus, wrapped the strap around my neck, then handheld the camera out the window.
 
With both hands.
 
It was a matter of guessing if the camera was level and pointed in the desired direction. Once that was settled, I pressed the shutter button slightly, allowing the lens to autofocus, then pressed the button down further, firing the shutter.  


We were in the city because my wife Lisa, daughter, and son-in-law had tickets to see Garth Brooks on Sunday night. Lisa also was going to the Jersey Boys show on the previous night. I wasn't going to the show or concert, but was happy to be along for the weekend. Early Sunday was when my event was scheduled. I made a pre-dawn run out to Red Rock Canyon to the west of the city. See the Red Rock Canyon post for the photographs. 

Lisa waits yet again for the guy with the camera.

A gondolier conveys a couple around the canal at the Venetian. Top speed seemed to be about 1/16th of a knot. No chance of an on-the-job workout for the gondolier.

Chinese New Year decorations at the Palazzo.

Looking up.

A red dragon. Red being a good luck color, decorations don't get much more appropriate than this for Chinese New Year.

Although the Strip is interesting enough in daylight, it really comes visually alive after sundown. The following photos were made within a mile of our hotel. The venues for the show and concert were walking-distance close to our hotel, so we didn't have to drive the rental car or take a taxi anywhere, which was a relief.

 
Gondola and canal at the Venetian.

Columns and arches of the Venetian.


A footbridge at the Venetian rising toward Madame Toussant's. The photo shows the outside portion of the bridge, the traditional stairs. The center of the bridge is occupied by dual escalators.

Exterior of the Palazzo.

Night view from our room at Harrah's. Handholding the camera out the window never got less nerve-wracking.

Saturday, February 6, 2010

Software Review: FastStone 4.0

Since the digital camera era began, I've made approximately 65,000 photographs with three cameras. I shudder to think what that number of prints would have cost in the film era. I doubt that I made over 3,500 photographs in the film age with Kodak and Polaroid cameras, the Canon FX I bought in college, and the AE-1 I had in later years. It was simply too expensive to make a lot of photos.

When I started shooting with my first digital, a 2 megapixel Kodak, I got into a nasty habit. I kept everything. Most of it was crap. As newer, better digital cameras came into my hands, the CDs started stacking up. Then the DVDs came along. I knew I was in trouble in 2009 when I converted the CD archive to DVD and they stacked to the top of a 50-disc spindle.

I converted the DVD archive to two 1 TB external drives in 2009. I've been sorting through the archives and throwing photos away since, as I keep adding new photos. The process of getting rid of the bloat was grindingly slow with Explorer, View NX, or PaintShop Pro, particularly when working with a directory containing a large number of files. It seemed to me that there had to be a faster, better photo organizing program than what I was using, so I performed a search for free photo software. One of the search results was FastStone Image Viewer 4.0. I compared it to a half-dozen similar products, and decided it was worth a try. I could always uninstall it if it wasn't what I needed.


The FastStone user interface resembles Windows Explorer, with the addition of a preview pane below the directory tree. When I started working with the program, I immediately found the resizeable preview pane useful. FastStone is truly fast, cataloguing thumbnails and displaying full screen views at speeds that make Windows Explorer and Nikon's ViewNX look quite laggardly. It does move a bit slow when deleting a group of files, but more than makes up for it with the speed of all other operations.


When you want to display a full-screen version of a photo, double-click on the thumbnail. The full-screen versions of photos load very quickly, and a minimal amount of photo data is displayed in the upper left corner of the screen, as shown above. To change the photo displayed in the preview pane, click on the desired thumbnail.

To display thumbnails click on the thumbnail button on the toolbar as shown above.

To display the report view, click on the Report View button on the toolbar as shown above.


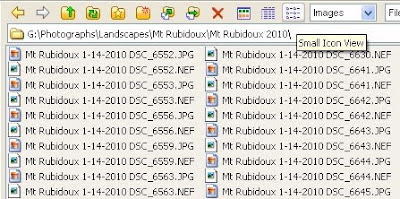
To display small icons, click on the Small Icon View button on the toolbar as shown above.

The Images and Size drop-down lists shown below provide a convenient way to sort the thumbnails.  


FastStone also has a basic set of photo editing tools. Since my photo editing is limited to simple operations such as cropping and dust removal, this is a full tool set. The crop board tool is shown below


The software I was looking for, FastStone is a fast and capable photo organizer. Being freeware, the price is absolutely right. If you don't need all the features of a high-ticket photo organizer, it might be worth a try.

Using FastStone will speed up the sorting of my archives. I'll be done with the heavy lifting early this year, and will be able to spend less time with the computer, and more with the camera. And I have a solution for the nasty habit that caused the problem in the first place. Using the card reader, I now pre-sort photos while they are still on the memory card. Most of the trash never gets uploaded.

Download FastStone 4.0 at http://www.faststone.org/FSViewerDetail.htm.

Software Review: Bulk File Renamer v1.01

If you have large photo archives, or a large number of any type of file, it is often useful to be able to rename files in batches, rather than editing  filenames one at a time. Batch renaming is a feature of expensive photo editing applications, but I don't use the high-ticket image manipulation software. The Web is glutted with shareware and freeware, so when I recognized the need for renaming batches of photo files a few months ago. I performed a search, and along with dozens of other programs that did the same thing, I found Bulk File Renamer v1.01.

Bulk File Renamer is freeware. I've been using it for several months, while sorting through my photo archive. It is simple to use, and processes batches rapidly. You can replace entire filenames or append a prefix to an existing filename. The application also includes a numbering counter.

An example of using the application is outlined below.


To rename a group of files by appending a prefix to the original filename, navigate to the desired directory, then select the files to be renamed as shown above. Type the new name prefix in the Prefix text box. The bottom pane will display a list of the current filenames next to the new filenames. Select the Before radio button, then click on the Rename button.

A confirmation dialog box will appear. Click on the OK button to rename the batch of files.

I've only seen the application "choke" once, and that happened when it was performing a batch rename within a directory containing over 9,800 files (which is less than sane to begin with). BFR locked up, and didn't perform the operation. I shut the program down, then re-started it and it performed perfectly on the 2nd try.

You can download Bulk File Renamer v1.01 at http://www.bexonsoft.com/.

Monday, February 1, 2010

Lamplight

Several evenings ago I noticed, yet again, the large volume of light which was spilling from streetlamps across the City of Riverside. The light pollution brightens the night skies, illuminating clouds, and on most nights produces a dim half-light rather than a true dark. On an uncloudy night it is possible to see first magnitude stars and planets, but stellar bodies that produce less light are obscured by the ground illumination.
There's nothing unusual about light pollution. Its a side effect of urban and suburban development. What is unusual about the lamplight here is the strong orange/red tint that the newer lights give off. The older lights, which have long been replaced, emitted a cold blue/white light.
Anyway, I was looking at some clouds moving slowly across what was once a black dome, and happened to see the orange tint on their undersides. I set the camera up on a tripod to capture the scene.
The first couple frames are of the clouds above the city.

I decided to get something closer to the lamplight source a couple nights later, and made the two following photos of tree branches near a lamp. The 2nd frame is not as "technically correct" as the first because of the flare, but I like the photo and since flare frequently shows up in panning shots in movie films, I'm going to display it here, anyway.


Two nights later, I looked at the rising moon, and seeing more orange in the cloudy sky backlit by the moon, I tried a few more frames.

After I captured the frame above a car parked slightly down the street. The driver left the engine running and the headlights on. The stream of white headlamp light in the left of the photo substantially changed the lighting of the scene, and provided a contrasting light color.


The photo immediately above is from a different viewpoint. I swiveled the camera in the tripod to catch the street on the right illuminated in orange light.